In this article, I will introduce you to some well known tools which security analysts use for Network Security Risk assessment, to know more about the layout of the network they are trying to test and also gather intelligence about that company, which the security analyst can use later on to conduct further tests and poke it for its weak points. The more information we can obtain, the more we can advice our client company of any potential problem areas and provide a better Network Security Risk Assessment. This whole process is called footprinting.
Footprinting:(Definition from Wikipedia)
Footprinting is the technique of gathering information about computer systems and the entities they belong to. This is done by employing various computer security techniques, as Ping Sweeps, TCP Scans, UDP Scans, OS Identification, Network Enumeration, Registrar Queries, Organizational Queries, Domain Queries, Network Queries, POC Queries and DNS Interrogation
When used in the computer security lexicon, “footprinting” generally refers to one of the pre-attack phases; tasks performed prior to doing the actual attack. Some of the tools used for footprinting are samspade, nslookup, traceroute and neotrace.
Network Security Risk Assessment # 1: PAROS (http://www.parosproxy.org)
Paros is a Java based HTTP/HTTPS proxy for assessing web application vulnerability. It supports editing/viewing HTTP messages on-the-fly. Other featuers include spiders, client certificate, proxy-chaining, intelligent scanning for XSS and SQL injections etc.
Paros requires that you have Java J2SE installed which you can download from Sun here. Paros is also available in both Unix and Windows platforms. You can download Parox Proxy here.
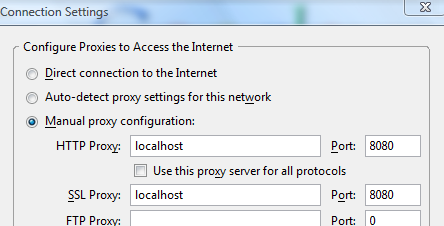
1. After you download Paros, you need to configure your browser’s Internet options. Set your HTTP proxy and Secure proxy addresses to “localhost” with port “8080” as shown below
2. Launch Paros. In this example, we will use mit.edu as our target Internet location. Type in http://www.mit.edu. If you go back to Paros, you will see a screen that looks something like this
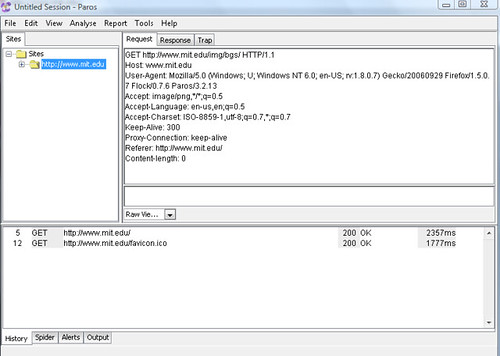
3. Now, we wish to scan our target system. For that, in Paros, in the left side pane, you will see mit.edu. Right click and then select Spider. Once you click OK, Paros would scan the target website, in this case, MIT’s website for any potential vulnerabilities.
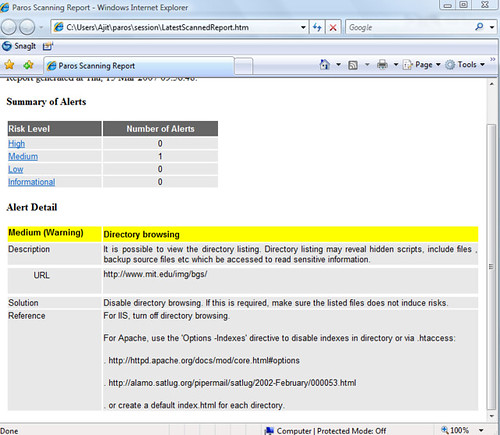
4. I stop the scan after a couple of seconds. However, that is enough to generate a potential vulnerability in the web site. Here, I am being shown that mit.edu is vulnerable to directory listing. Directory listing may reveal hidden scripts, include files , backup source files etc which be accessed to read sensitive information.
5. In this example, we used mit.edu as our target site. You would replace mit.edu with your client’s site for further analysis.
Network Security Risk Assessment # 2: Whois
The WHOIS system originated as a method that system administrators could use to look up information to contact other IP address or domain name administrators (almost like a “white pages”). It is surprising how some web administrators put so much information out there which can be used by hackers to attack a network. In our case, we will be using it to find more about our target network and gather further intelligence.
In this example, we will use Microsoft(http://www.microsoft.com) as our target network
1. Perform a reverse DNS lookup: Launch a Unix shell of your choice and type the command host microsoft.com and press enter. The host command performs a reverse DNS lookup and returns an IP address. You will see something like below
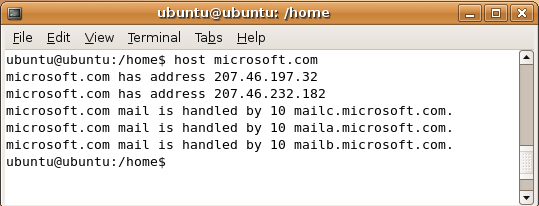
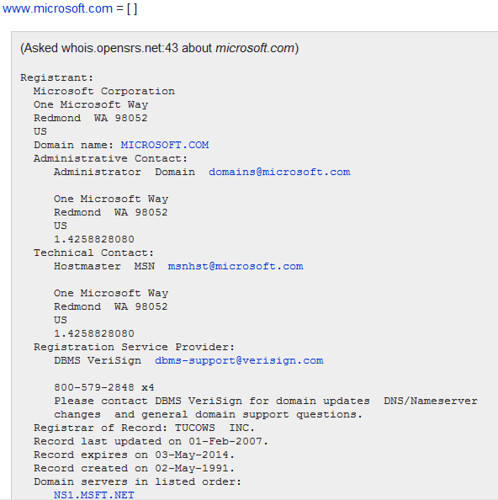
2. Now, type in nc whois.arin.net 43 and press Enter. In computing, netcat(nc) is a network utility for reading from and writing to network connections. Your terminal would now show a blinking cursor where you enter the IP address of microsoft.com which you obtained from step 1 above. Your screen would look like something below

3. For those who are not familiar with a Unix environment, you can use Sam Spade for obtaining the information above on Microsoft.
Network Security Risk Assessment # 3: Looking up Web Banner Information
Using the web banner information, we can obtain valuable intelligence on our target network such as the type of web server being used by the company whether IIS or Apache, the kind of operating system whether Linux or Windows Server, the date it was last updated, code being used to develop the site etc
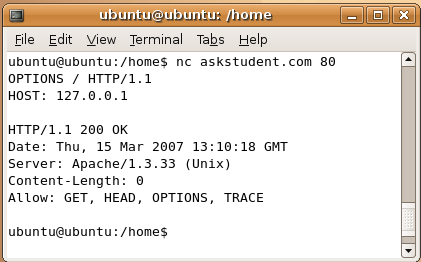
1. In this example we are using AskStudent as our target site, open your Linux shell and type in nc askstudent.com 80 and press Enter
2. On the next line, type OPTIONS / HTTP/1.1 and press Enter. Notice that after options there is a space, then slash then space then http then slash then 1.1
3. Then type HOST: 127.0.0.1 and press Enter twice. That is host then colon then space then 127.0.0.1. You are now given the banner commands you can run on that web server. We can see that AskStudent runs on Apache version 1.3.33.
4. Now, we can go ahead and find header information via the banner. We will now be using Florida Tech as the target site. In the same Linux shell, type in nc fit.edu 80 and press Enter
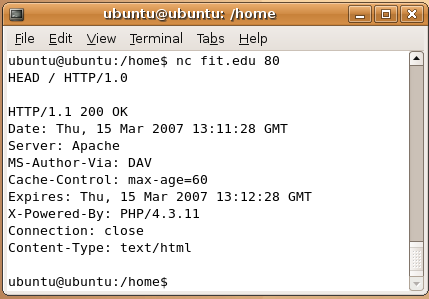
5. On the next line, type HEAD / HTTP/1.0 and press Enter twice to get the header information. Your screen should look something like this.
